Vault Secrets Management
Summary
Section titled “Summary”Vault is an identity-based secret and encryption management system. It can be used as a central store to manage access and secrets across applications, systems, and infrastructure.
Vault Environments
Section titled “Vault Environments”We currently have two specific Vault instances setup to provide secrets to our infrastructure.
- https://vault.gitlab.net for all environments using secrets
- https://vault.pre.gitlab.net for testing configuration/deployments
Architecture
Section titled “Architecture”High Level Overview
Section titled “High Level Overview”graph TB
https://vault.$env.gitlab.net
subgraph GCP
https://vault.$env.gke.gitlab.net
IAP-Load-Balancer
Internal-Clients
Internal-Load-Balancer
Vault-Raft-Snapshots-Bucket
subgraph GKE-Vault-Deployment
Vault
Raft-PVC
K8s-CronJob
end
end
https://vault.$env.gitlab.net --> IAP-Load-Balancer --> Vault
Internal-Clients --> https://vault.$env.gke.gitlab.net --> Internal-Load-Balancer --> Vault
Vault --> Raft-PVC
K8s-CronJob --> Vault
K8s-CronJob --> Vault-Raft-Snapshots-Bucket
The application is deployed in Kubernetes using the official Vault Helm chart from Hashicorp.
- Helm chart deployment
- Internal and external ingress (see ingress section below)
Availability
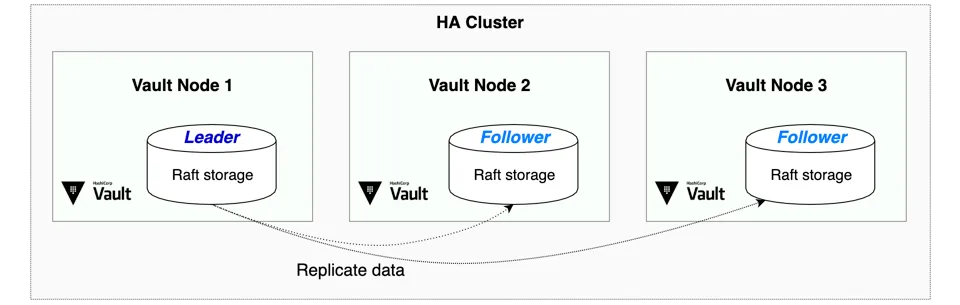
Section titled “Availability”We run Vault in High Availability mode. This consists of one active Vault server and several standby servers. Since we’re using the community version, standby instances are not unsealed and are only replicating the data but are not able to read it, and they will forward all requests to the leader instance. The standby instances only unseal when being promoted to leader.
We have enabled automatic unseal with GKMS. The unsealing process is delegated to Google KMS in the event of a failure. The Vault cluster will coordinate leader elections and failovers internally.
We have configured 5 replicas with spread constraints for pods to be in different hosts and be distributed in different zones, which gives us multi-zone failure tolerance across 3 different zones.
Raft storage is configured with regional SSD persistent disks which provide durable storage and replication of data between three zones in the same region.
Additionally, we have multi-region backups we can restore as disaster recovery (in case of full region failure) (see storage section below).
In short, we have redundancy across zones in the us-east1 region, but not across different regions. However we are able to easily and rapidly restore the service in a different region when needed.
Ingress
Section titled “Ingress”We have one internal and one external endpoint, keeping the service from being directly exposed to the internet.
- External ingress for web user access is accessible through a GCP HTTPS load balancer that uses Google Identity-Aware Proxy
(IAP). It can be accessed through
https://vault.gitlab.net(production) andhttps://vault.pre.gitlab.net(preprod).- Note: Vault CLI does not work through this load balancer at the time of this writing, see this feature request.
- Internal ingress for CI/Kubernetes/Terraform/Chef/Ansible/etc (API) is exposed through a Kubernetes service with a zonal network endpoint group (NEG) as a backend. The Vault service uses the default port
8200which is then exposed on port443by the ingress. It can be access throughhttps://vault.ops.gke.gitlab.net(production) andhttps://vault.pre.gke.gitlab.net(preprod).- Prometheus metrics are gathered from the endpoint
/v1/sys/metricson that same port.
- Prometheus metrics are gathered from the endpoint
Storage
Section titled “Storage”Vault’s Integrated Storage engine Raft is used for storage. This allows all the nodes in a Vault cluster to have a replicated copy of Vault’s data locally. It is also used as the HA backend.
We are not using the enterprise version for Vault which come with automatic backups. Instead we are running a Kubernetes CronJob to create and save raft snapshots to a GCS bucket every hour. Manual testing was done in the pre environment for validation, snapshot backup, and restoration.
Snapshot backups are saved across multiple regions in the United States and can be used for region failure disaster recovery.
Resources and Configuration
Section titled “Resources and Configuration”- Infrastructure resources (IAM, KMS, etc) are managed through Terraform via 2 modules vault (resources deployed in the projects
gitlab-preandgitlab-ops) and vault-config (more sensitive resources deployed in a separate dedicated project) located in theconfig-mgmtrepository.preenvironment Vault configuration:opsenvironment Vault configuration:
- To maintain consistency across deployments Vault configurations are maintained through the Terraform provider and located in the
config-mgmtrepository:
Maintenance automation
Section titled “Maintenance automation”Some Kubernetes cron jobs have been setup to help with regular maintenance of the Vault cluster:
vault-identity-entities-cleaner
Section titled “vault-identity-entities-cleaner”- Cronjob definition: https://gitlab.com/gitlab-com/gl-infra/k8s-workloads/gitlab-helmfiles/-/blob/master/releases/vault/charts/vault-extras/templates/vault-identity-entities-cleaner-job.yaml
- Container image: https://gitlab.com/gitlab-com/gl-infra/ci-images/-/tree/master/vault-identity-entities-cleaner
- Script: https://gitlab.com/gitlab-com/gl-infra/ci-images/-/blob/master/vault-identity-entities-cleaner/scripts/cleaner.rb
Vault creates an identity entities for each user authenticating into it, which includes humans via OIDC, Kubernetes service accounts and GitLab CI jobs authenticating via JWT. In particular, each CI job has its own unique identity based on their job ID claim, that are then never used again (unless the job is retried later). Vault currently doesn’t have any mechanism to automatically cleanup old unused identities so they keep accumulating indefinitely, filling the storage, causing high memory usage and degrading performances (see this issue).
This job remediates this problem by deleting in small batches all identity entities that are older than 7 days (max TTL for OIDC logins) every hour, keeping the storage size under control.
vault-pvc-rotater
Section titled “vault-pvc-rotater”- Cronjob definition: https://gitlab.com/gitlab-com/gl-infra/k8s-workloads/gitlab-helmfiles/-/blob/master/releases/vault/charts/vault-extras/templates/pvc-rotater-job.yaml
Vault uses a BoltDB database as its Raft logs storage, which cannot shrink to recover space when data is deleted. Although it tries to reuse old pages when possible, the database file inevitably keeps growing indefinitely (see BoltDB Raft logs). This eventually leads to memory pressure and/or OOM events as the database file is loaded into memory as page cache which increases memory usage as the file keeps growing.
This job remediates this problem by deleting the oldest Persistent Volume Claim and rotating its attached pod once a week, so that the node bootstraps itself with a fresh Raft snapshot. This also serves as a chaos monkey ensuring that automatic Vault node recovery keeps working properly.
Authentication
Section titled “Authentication”User authentication
Section titled “User authentication”We’re using Google Identity-Aware Proxy for the external load balancer and Okta OIDC is required to log into the Vault web interface.
API authentication
Section titled “API authentication”- CI runners can be authenticated with JWT using JWKS
- GCP servers (chef client, ansible, etc) can be authenticated with Google Cloud auth (service accounts or instance service accounts)
- Kubernetes can be authenticated with Kubernetes Service Account Tokens
Identities/Roles and Policies are used to enforce RBAC and limit scope of access to necessary secrets. See the Secret Access section for more information.
Security Considerations
Section titled “Security Considerations”Data Encryption and Unsealing
Section titled “Data Encryption and Unsealing”Vault data is encrypted at all times. When Vault is started, it is always started in a sealed state and will not be able to decrypt data until it is unsealed.
To unseal Vault, a root key is needed to decrypt the Vault data encryption key.
To ensure that the root key is never known or leaked, we have configured auto-unseal using GCP KMS which lets us leverage GCP KMS to encrypt and decrypt the root key. Only the KMS key is able to decrypt the root key in our configuration. There is no other method possible to decrypt the root key. The Terraform configuration can be found here.
graph TD
    A[Encryption Key] -->|Encrypted by | B(Root Key)
    B --> D[GCP Cloud KMS key]
For better security access control, the KMS key is hosted in a separated GCP project:
- Production:
gitlab-vault-production - Staging:
gitlab-vault-staging
Recovery keys
Section titled “Recovery keys”Vault uses an algorithm known as Shamir’s Secret Sharing to split the recovery key into shards. It is important to know that the recovery key can only used to generate a root token but cannot be used to unseal Vault or decrypt any data.
Additionally, we’re also using end-to-end TLS encryption for Vault.
Secret Access
Section titled “Secret Access”Role-based Access Control (RBAC) Policies
Section titled “Role-based Access Control (RBAC) Policies”Vault uses policies to govern the behavior of clients and instrument Role-Based Access Control (RBAC). A policy defines a list of paths. Each path declares the capabilities (e.g. “create”, “read”, “update”, “delete”, “list”, etc) that are allowed. Vault’s denies capabilities by default unless explicitly stated other wise.
There are some built in policies generated by Vault and we’ve currently configured the following policies:
- General usage policies
- GitLab CI policies
- Infrastructure project GitLab CI policies
- Kubernetes policies
JWT Authentication and Bound Claims
Section titled “JWT Authentication and Bound Claims”The JSON Web Token (JWT) method can be used to authenticate with Vault by a JWT authentication method or an OIDC. These JWTs can contain claims or a key/value pair. These can be used by Vault to validate that any configured “bound” parameters match which provide more granularity to authentication permissions.
For an example, see the the bounds claims configured for OIDC users based on Okta group memberships.
More details and specifications can be found in the Vault documentation.
Observability
Section titled “Observability”Prometheus and Thanos
Section titled “Prometheus and Thanos”Vault is monitored via Prometheus in GKE. Configuration is done through a PodMonitor which scrapes the /v1/sys/metrics endpoint. Our GKE prometheus metrics are also accessible in our Thanos cluster (example metric).
A service overview dashboard can be found in Grafana.
We’ve configured audit logging to output to STDOUT which forwards logs to Kibana. The Vault logs can be viewed here.
Administration
Section titled “Administration”See Vault Administration.
See How to use Vault for Secrets Management in Infrastructure.
Troubleshooting
Section titled “Troubleshooting”Determining Pod status and logs
Section titled “Determining Pod status and logs”Connect to the appropriate GKE cluster, then list/look at all pods in the vault namespace:
kubectl -n vault get podskubectl -n vault logs vault-0The active node can be found with the label vault-active=true:
kubectl -n vault get pods -l app.kubernetes.io/name=vault -l vault-active=trueDetermining status of Vault from Vault itself
Section titled “Determining status of Vault from Vault itself”You can use a SOCKS5 proxy or forward the port 8200 and run Vault locally (see CLI):
# In a separate shell sessionssh -D 18200 bastion-01-inf-ops.c.gitlab-ops.internal# In your first sessionexport VAULT_ADDR=https://vault.ops.gke.gitlab.netexport VAULT_PROXY_ADDR=socks5://localhost:18200vault login -method oidc role=adminvault operator peersvault operator raft list-peers# Ensure all Vault pods are listed and their `State` is either `leader` or `follower`# In a separate shell sessionkubectl -n vault port-forward svc/vault-active 8200# In your first sessionexport VAULT_ADDR=https://localhost:8200export VAULT_TLS_SERVER_NAME=vault.ops.gke.gitlab.netvault login -method oidc role=adminvault operator peersvault operator raft list-peers# Ensure all Vault pods are listed and their `State` is either `leader` or `follower`Alternatively, you can connect to one of the Vault pods and run:
kubectl -n vault exec -it vault-0 sh$ vault status$ export VAULT_SKIP_VERIFY=true# Ensure `Initialized` is `true` and `Sealed` is `false`$ vault login# enter root token$ vault operator peers$ vault operator raft list-peers# Ensure all Vault pods are listed and their `State` is either `leader` or `follower`Generating a root token
Section titled “Generating a root token”Official documentation: https://learn.hashicorp.com/tutorials/vault/generate-root
When admin access is not sufficient or broken, a root token can be generated using the recovery keys. For this you will need access to the entry Vault Production in the Production vault in 1password.
:warning: Root tokens are dangerous as they allow to do anything in the cluster and don’t expire. For this reason, please remember to revoke it using vault token revoke -self once you are done using it! :warning:
-
First, setup CLI access by following the steps described here
-
Verify that Vault is unsealed:
Terminal window vault statusIf not, troubleshoot the issue
-
Grab 3 recovery keys of the 5, and run the following:
Terminal window vault operator generate-root -init# Note the OTP in the outputvault operator generate-root# Enter recovery key #1vault operator generate-root# Enter recovery key #2vault operator generate-root# Enter recovery key #3# The output should now show "Complete true"# Grab the Encoded Token from the output and the OTP from the first step and run:vault operator generate-root -decode $ENCODED_TOKEN -otp $OTP# The output is your root token, now you can export it:export VAULT_TOKEN=hvs.thetokenfromabovevault token lookup# This should show something like this:# Key Value# --- -----# accessor XYZ# creation_time 1658469449# creation_ttl 0s# display_name root# entity_id n/a# expire_time <nil># explicit_max_ttl 0s# id hvs.thetokenfromabove# meta <nil># num_uses 0# orphan true# path auth/token/root# policies [root]# ttl 0s# type service -
When you are done troubleshooting, please revoke the token:
Terminal window vault token revoke -self
Backing up and restoring Vault
Section titled “Backing up and restoring Vault”Vault Raft snapshots are taken hourly. They are created by a Kubernetes CronJob that runs inside the GKE cluster that runs Vault. It uses vault operator raft snapshot save to create an encrypted copy of all Vault data, and then uploads to it to a GCS bucket inside a separate GCP project:
- Production:
gitlab-vault-production-vault-raft-snapshotsingitlab-vault-production - Staging:
gitlab-vault-staging-vault-raft-snapshotsingitlab-vault-staging
Restoring Vault from a snapshot into an existing functional installation
Section titled “Restoring Vault from a snapshot into an existing functional installation”Note that doing this restores everything entirely back to the state it was at the snapshot, removing all new data since the snapshot was taken.
-
First identify the Vault snapshot you wish to restore and download it locally:
Terminal window gsutil ls gs://gitlab-vault-production-vault-raft-snapshots/gsutil cp gs://gitlab-vault-production-vault-raft-snapshots/2022/07/22/raft-20220722-120000+0000.snap . -
Then, setup CLI access by following the steps described here
-
Restore the snapshot:
Terminal window vault operator raft snapshot restore raft-20220722-120000+0000.snap -
:warning: Finally, don’t forget to revoke your root token!
Terminal window vault token revoke -self
Restoring Vault from a snapshot into an empty installation
Section titled “Restoring Vault from a snapshot into an empty installation”:warning: As we use GKMS auto-unseal for our Vault, you need to make sure the GKMS key that was originally used with the Vault snapshot is still available. As this is controlled by Google, they are responsible for maintaining its snapshot and availability. :warning:
-
First identify the Vault snapshot you wish to restore and download it locally:
Terminal window gsutil ls gs://gitlab-vault-production-vault-raft-snapshots/gsutil cp gs://gitlab-vault-production-vault-raft-snapshots/2022/07/22/raft-20220722-120000+0000.snap . -
Make sure the Helm chart deployment is successful
-
You should see the Vault pods running and crashing in a loop (because they are uninitialized and don’t have a cluster to join):
Terminal window kubectl -n vault get pods -
Scale down the cluster to a single pod so that replication doesn’t start until the snapshot has been restored:
Terminal window kubectl -n vault scale sts/vault --replicas=1 -
To make the following steps easier, edit
failureThresholdof the healthchecks to some high number in the StatefulSet to prevent the unhealthy pod from restarting before you initialize it:Terminal window kubectl -n vault edit sts vault# livenessProbe:# failureThreshold: 1000# readinessProbe:# failureThreshold: 1000 -
In a separate shell session, establish port-forwarding to the pod:
Terminal window # In a separate shell sessionkubectl -n vault port-forward pod/vault-0 8200 -
Then initialize Vault, take note of the root token and export it (no need to save it elsewhere, it will be gone after the snapshot restoration):
Terminal window # In your first sessionexport VAULT_ADDR=https://localhost:8200export VAULT_TLS_SERVER_NAME=vault.ops.gke.gitlab.netvault operator initexport VAULT_TOKEN=hvs.something -
Now you can force-restore the snapshot:
Terminal window vault operator raft snapshot restore -force raft-20220722-120000+0000.snap -
Check in the pod logs that Vault was able to restore and unseal:
Terminal window kubectl -n vault logs vault-0 -
You can now restore
failureThresholdto its original value in the StatefulSet:Terminal window kubectl -n vault edit sts vault# livenessProbe:# failureThreshold: 2# readinessProbe:# failureThreshold: 2 -
And scale back to 5 replicas:
Terminal window kubectl -n vault scale sts/vault --replicas=5 -
You should now see the other pods spin up and become healthy, as they will join the Vault cluster and start replicating automatically:
Terminal window kubectl -n vault get pods -
To verify that the cluster is healthy, login as
admin(or generate a root token) and then:Terminal window vault login -method=oidc role=adminvault operator peersvault operator raft list-peersvault operator raft autopilot state