scale-existing-shards
Access requirements
Section titled “Access requirements”- GPRD admin account access
- Chef server admin
- Write access in repos:
About this document
Section titled “About this document”This guide describes steps similar to those in the new-shards.md guide, however, scaling a shard requires a few less steps.
Quota Increases
Section titled “Quota Increases”- Reach out to Google reps in
#ext-google-cloudSlack channel.- NOTE: Do this as early as possible in the process, as soon as we have an idea of many resources we’ll need, even before the projects exist. Do not assume we will have auto-approval on anything.
- Collaborate with GCP reps on provisioning and due dates.
- Submit standard quota increase requests in the GCP console.
:warning: If you need to increase quotas for Heavy-weight read requests per minute, it is possible you need to specifically increase Heavy-weight read requests per minute per region as seen in this issue.
Typically, the following quotas will need to be increased:
- N2D CPUs (us-east1)
- Read requests per minute per region (us-east1)
- Heavy-weight read requests per minute per region (us-east1)
- Queries per minute per region (us-east1)
- Concurrent regional operations per project per operation type (us-east1)
Compare the settings with other existing projects and request needed adjustments.
https://console.cloud.google.com/iam-admin/quotas?project=gitlab-r-saas-l-m-amd64-org-1&walkthrough_id=bigquery--bigquery_quota_request&pageState=(%22allQuotasTable%22:(%22f%22:%22%255B%257B_22k_22_3A_22Name_22_2C_22t_22_3A10_2C_22v_22_3A_22_5C_22N2D%2520CPUs_5C_22_22_2C_22s_22_3Atrue_2C_22i_22_3A_22displayName_22%257D_2C%257B_22k_22_3A_22_22_2C_22t_22_3A10_2C_22v_22_3A_22_5C_22OR_5C_22_22_2C_22o_22_3Atrue%257D_2C%257B_22k_22_3A_22Name_22_2C_22t_22_3A10_2C_22v_22_3A_22_5C_22Heavy-weight%2520read%2520requests%2520per%2520minute%2520per%2520region_5C_22_22_2C_22s_22_3Atrue_2C_22i_22_3A_22displayName_22%257D_2C%257B_22k_22_3A_22_22_2C_22t_22_3A10_2C_22v_22_3A_22_5C_22OR_5C_22_22_2C_22o_22_3Atrue%257D_2C%257B_22k_22_3A_22Name_22_2C_22t_22_3A10_2C_22v_22_3A_22_5C_22Read%2520requests%2520per%2520minute%2520per%2520region_5C_22_22_2C_22s_22_3Atrue_2C_22i_22_3A_22displayName_22%257D_2C%257B_22k_22_3A_22_22_2C_22t_22_3A10_2C_22v_22_3A_22_5C_22OR_5C_22_22_2C_22o_22_3Atrue%257D_2C%257B_22k_22_3A_22Name_22_2C_22t_22_3A10_2C_22v_22_3A_22_5C_22Queries%2520per%2520minute%2520per%2520region_5C_22_22_2C_22i_22_3A_22displayName_22%257D_2C%257B_22k_22_3A_22_22_2C_22t_22_3A10_2C_22v_22_3A_22_5C_22OR_5C_22_22_2C_22o_22_3Atrue%257D_2C%257B_22k_22_3A_22Name_22_2C_22t_22_3A10_2C_22v_22_3A_22_5C_22In-use%2520IP%2520addresses_5C_22_22_2C_22i_22_3A_22displayName_22%257D_2C%257B_22k_22_3A_22_22_2C_22t_22_3A10_2C_22v_22_3A_22_5C_22OR_5C_22_22_2C_22o_22_3Atrue%257D_2C%257B_22k_22_3A_22Name_22_2C_22t_22_3A10_2C_22v_22_3A_22_5C_22Concurrent%2520regional%2520operations%2520per%2520project%2520per%2520operation%2520type_5C_22_22_2C_22s_22_3Atrue_2C_22i_22_3A_22displayName_22%257D_2C%257B_22k_22_3A_22_22_2C_22t_22_3A10_2C_22v_22_3A_22_5C_22region_3Aus-east1_5C_22_22%257D%255D%22,%22s%22:%5B(%22i%22:%22displayName%22,%22s%22:%220%22),(%22i%22:%22currentPercent%22,%22s%22:%221%22),(%22i%22:%22sevenDayPeakPercent%22,%22s%22:%220%22),(%22i%22:%22currentUsage%22,%22s%22:%221%22),(%22i%22:%22sevenDayPeakUsage%22,%22s%22:%220%22),(%22i%22:%22serviceTitle%22,%22s%22:%220%22),(%22i%22:%22displayDimensions%22,%22s%22:%220%22)%5D))Document CIDRS
Section titled “Document CIDRS”- Register unique CIDRs for the new ephemeral runner projects in the Runbooks
- :warning: If you’re creating a new CIDR block, make sure you add it to the Global allow list.
- In the Admin interface:
Settings -> General -> Visibility and access controls. - If this is missed, we risk running into incidents like this one.
- In the Admin interface:
Define GCP projects in terraform
Section titled “Define GCP projects in terraform”Create the projects for the ephemeral VMs in the config-mgmt repo. Each runner manager will point to one of the projects created here.
- Locate the shard you’re scaling in environments/env-projects/saas-runners.tf
- Increase the
countvariable by the desired value. - Submit and merge an MR with your changes.
- Confirm the projects are created successfully
- May require an SRE who has permissions to check, as most devs will not have permissions for these projects until the configuration step below when we grant permissions.
Configure GCP projects in terraform
Section titled “Configure GCP projects in terraform”- Locate the shard you’re scaling under
ephemeral_project_networksin environments/ci/variables.tf - Add a new entry under
ephemeral_subnetworksandephemeral_service_projects. - Add the CIDRs under
ci-gateway-allow-runnersin environments/gprd/main.tf (using values set in the Document CIDRs step above) - Locate the directory for the shard name you’re scaling under
environments/- Add a new entry for the new projects under the
projectvariable in thevariables.tffile.
- Add a new entry for the new projects under the
- At the root of
config-mgmt, runterraform fmt -recursive - Submit an MR with your changes.
Add chef-repo configs
Section titled “Add chef-repo configs”Add the chef configs for the new runner-manager VMs. This will associate with config.toml settings on the runner managers, as well as some other settings (secrets config, analytics, etc).
- Copy (and update as needed) the existing config for the
greensettings of one of the existingrunners-manager-<shard name>-green.jsonunderroles/. - Copy (and update as needed) the existing config for the
bluesettings of one of the existingrunners-manager-<shard name>-green.jsonunderroles/.
Note: initial concurrent setting should be 0 until we are ready to enable the runners
Add secrets to vault
Section titled “Add secrets to vault”- Locate the secrets vault for the shard you’re scaling in this location.
- Add two entries for each new runner-manager you’re adding, one for the
greenand one for thebluesecrets.
Run chef-client on each new runner manager
Section titled “Run chef-client on each new runner manager”Note: will need chef server admin user and secrets in vault!
:warning: Ensure concurrent settings for any new runners is set to 0.
SSH into each new runner-manager and initiate a chef-client run:
$ ssh runners-manager-private-green-9.c.gitlab-ci-155816.internal$ sudo chef-clientSet up TLS for each new runner manager
Section titled “Set up TLS for each new runner manager”SSH into each new runner-manager and initiate a manual tls-certificate test:
NOTE: you’ll need copy the /tmp/create-machine.sh and the /tmp/test-machine.sh from existing machines into the new VMs.
$ ssh runners-manager-private-green-9.c.gitlab-ci-155816.internal$ export VM_MACHINE=docker-machine-tls-test-vm-01$ /tmp/create-machine.sh && /tmp/test-machine.shIf the run fails, you’ll get an error hinting at the reason.
Don’t forget to remove any machines you manually created
Section titled “Don’t forget to remove any machines you manually created”docker-machine rm -f $VM_MACHINE
Add projects to cleaner
Section titled “Add projects to cleaner”In the infra-mgmt repo:
- add project names to
run.sh - add project names to
data/gcp/impersonated-accounts.yaml
Define cost factor
Section titled “Define cost factor”Raise concurrent levels
Section titled “Raise concurrent levels”- Update the
default_attributes.cookbook-gitlab-runner.global_config.concurrentvalue to match max capacity in the json file for the entire shard in chef-repo.
Enable the new runners on the existing shard
Section titled “Enable the new runners on the existing shard”:warning: Ensure concurrent settings for the runners are production ready, usually set to 1200.
SSH into each new runner-manager and run a chef-client as well as start/stop the gitlab-runner process depending on which runner is going to be active and which will be inactive. Suppose the blue deployment is inactive and the green is active, you’d perform the following:
$ ssh runners-manager-private-blue-9.c.gitlab-ci-155816.internal$ sudo chef-client-disable "Disabling until next deployment"$ sudo gitlab-runner stop
$ ssh runners-manager-private-green-9.c.gitlab-ci-155816.internal$ sudo chef-client-enable$ sudo chef-client$ sudo gitlab-runner start
After ensuring the runner process is up, enable the new runner-manager VMs through a GitLab Admin account:
-
Login as an Admin.
-
Go to the admin console
-
Filter using the shard’s tag, for example:
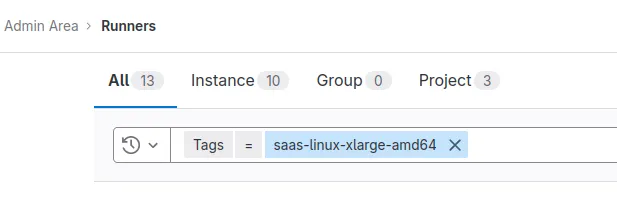
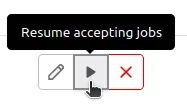
-
Click the play button to enable each of the new machines.
Unpause the new runners in GPRD
Section titled “Unpause the new runners in GPRD”- In the gitlab admin account, unpause the runners (only needs to be done once)